

This article is part of an ongoing series of posts, there’s an index here.
I originally planned to use my own reseller account’s DNS hosting with an existing domain, but I woke up one morning utterly convinced that I needed to own chinwag.im and I don’t have reseller access to that TLD through my normal setup. I picked it up through my Gandi account, but their DNS interface is … well, “awful” is being generous. I redelegated to Cloudflare instead, just on the free tier, so we’re still running a low-cost project, but we get some pretty DNS management.
I’ve also set up some mail forwarding so admin@chinwag.im is now coming to me, so I’ll have a consistent admin contact that’s both and email address and a JID.
Service Records
Service (or SRV) Records as used by XMPP are pretty cool, and solve a lot of traditional problems when it comes to running servers on the internet, and it’s a shame they never seemed to catch on that much with other services. Go read the SRV Wikipedia article if you want more details, but the basic idea is that you can look up how to connect to a specific service for a DNS domain without needing to know in advance which port it’s listening on.
We want two specific SRV records for our XMPP server. Once for client-to-server (c2s) connections which our users will use to connect, and one for server-to-server (s2s) which is essential for communicating with XMPP users on other services. These records are _xmpp-client._tcp and _xmpp-server._tcp.
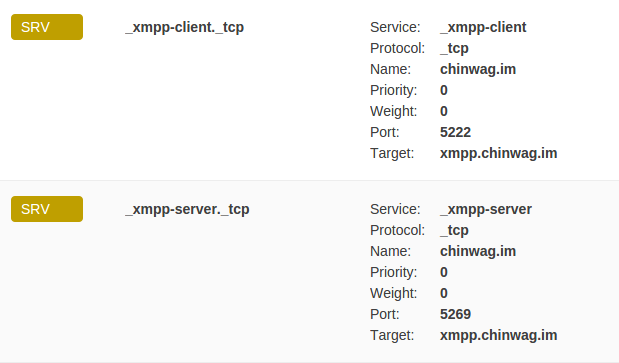
chinwag.im SRV records in Cloudflare DNS management
I’ve also defined xmpp.chinwag.im with both IPv4 (A) and IPv6 (AAAA) records, as a convenience alias for our server. When we start adding additional services like conferences that need a DNS entry, they’ll be created as CNAME aliases for xmpp.chinwag.im. The server has another hostname as well, but to keep things clear in the documentation I’ll be using the “xmpp” hostname exclusively to refer to it.
Without going into too much detail, these records state the name of the service (eg., xmpp-client), the protocol (TCP), the DNS name they are for (chinwag.im), priority and weight (not really relevant if you’re running one single server) and finally the hostname and port to connect to for this purpose (xmpp.chinwag.im:5222). This allows a client to get a lot of information out of DNS, relevant to completing a connection, from the starting point of just knowing the domain name.
SSL Certificates
When XMPP was first developed, encryption was more-or-less an optional extra – usually port 5223 would use SSL, and the default 5222 was unencrypted. If you see references in clients to “old-style” SSL or similar, the 5223 arrangement is what they mean. These days, you can consider it mandatory, and we’re all back on 5222. It’s still possible to configure a server to allow unencrypted client connections, but don’t. Setting things up properly isn’t that hard.
You have a choice of self-signing or obtaining a certificate from an existing Certificate Authority (CA). I’m not going to get into the debate about what CAs are acceptable, who decides, browser compatibility … although the latter is going to be highly relevant when we set up our web front-end.
For now, StartSSL offers free certificates for XMPP servers and is a popular choice. I’m going with them, and it’s not a terrible idea for you to do so as well. It’s a “good enough” solution to get us up and running. Their web site is a touch unintuitive but it’s fairly easy to get through the process, I’m not going to document it here.
Whatever path you take, you’ll end up with a certificate file, and a key file. Copy these into /etc/prosody/certs. To keep things orderly if you add extra virtual hosts on other domains later, I’d strongly suggest you include the domain in the file name.
# ls /etc/prosody/certs/

chinwag.im.crt chinwag.im.key localhost.crt localhost.key
The default, auto-generated “localhost” files can be deleted at this point, as we’ll add our SSL certificates into the Prosody configuration to replace them completely.
Your CA may require you to include an “intermediate” certificate. StartSSL does, and you can incorporate that by downloading their intermediate certificate and simply appending it to your file.
# wget https://www.startssl.com/certs/sub.class1.server.ca.pem

# cat sub.class1.server.ca.pem >>/etc/prosody/certs/chinwag.im.crt
See Prosody’s certificate documentation for more detail.
Updating the Configuration
The SSL settings section in our prosody.cfg.lua file now looks like this:
ssl = {
        key = "/etc/prosody/certs/chinwag.im.key";
        certificate = "/etc/prosody/certs/chinwag.im.crt";
}
So let’s restart Prosody at this point and check we’re all in working order, and do a quick status check with prosodyctl.
# service prosody restart
* Restarting Prosody XMPP Server prosody [ OK ]

# prosodyctl check
Checking config...
Done.

Checking DNS for host chinwag.im...

Checking certificates...
Checking certificate for chinwag.im
Certificate: /etc/prosody/certs/chinwag.im.crt

All checks passed, congratulations!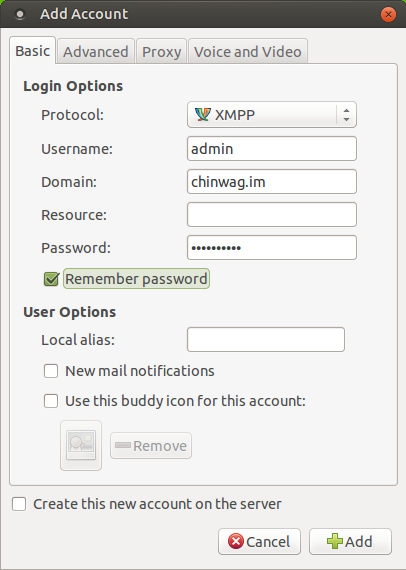
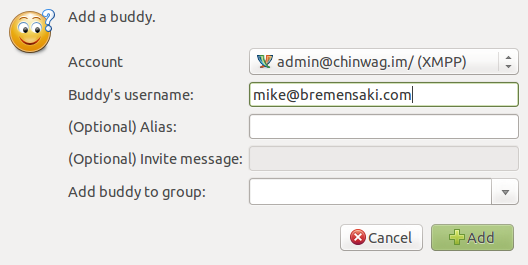
A better option is to try to add a contact and have a chat, or join a conference.
That’s the bare minimum of a functional server! Next up, I’ll add some additional modules into the mix to make life a bit nicer, and we’ll get our web front end up and running … and open to the public.